
 Pin
Pin
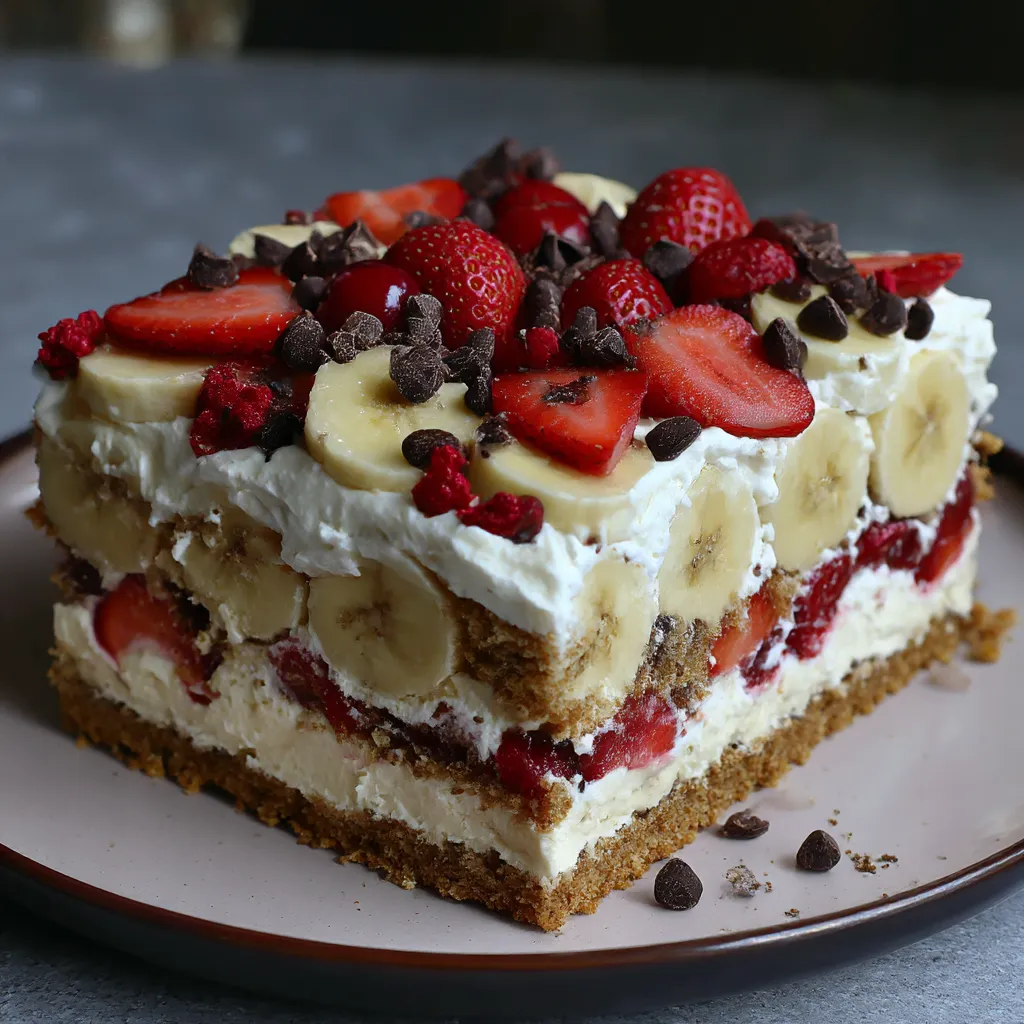
This chilled banana split delight packs all the sunshine of summer into one pan. It's got a crisp buttery crust, a thick creamy layer, and all the fun toppings you'd see at an ice cream shop. It's super simple and gets smiles at potlucks or anytime you want something sweet without heating up the kitchen. It's my go-to for family get-togethers since it feels both playful and nostalgic.
One steamy July day, my kids and I threw this together and now it's our summer dessert tradition. Seeing everyone chase stray pineapple bits across their plates is almost as much fun as putting it all together.
Dreamy Ingredients
- Graham cracker crumbs: forms the base and brings that bakery-style vanilla crunch grab plain for pure flavor
- Unsalted butter: melted up to hold the crust choose quality for best taste
- Granulated sugar: cuts the tang from the crust go with fine sugar for smooth blending
- Cream cheese: should be soft so it whips up smooth and gives body to the creamy middle always full-fat for the best hold
- Softened butter: mixes with your cream cheese to keep the filling super silky
- Powdered sugar: makes things sweet and keeps the filling dreamy sift it so it's not lumpy
- Vanilla extract: amps up the flavor dessert feels deeper with the real stuff
- Bananas: slice just before laying down to keep them looking fresh check for spotless skins
- Crushed pineapple: drain it as best you can or you'll get a soggy base pick ones in juice over syrup
- Fresh strawberries: for juicy bites and color look for the brightest, unbruised berries you can find
- Whipped topping: Cool Whip works or homemade if you've got the time it's the light layer that pulls everything together
- Chopped pecans or walnuts: bring the crunch pick nuts that taste and smell fresh
- Chocolate syrup: for that slick drizzle check the label for actual chocolate
- Maraschino cherries: finish things off with these grab the firmest, brightest ones you see
Step-by-Step Instructions
- Serve:
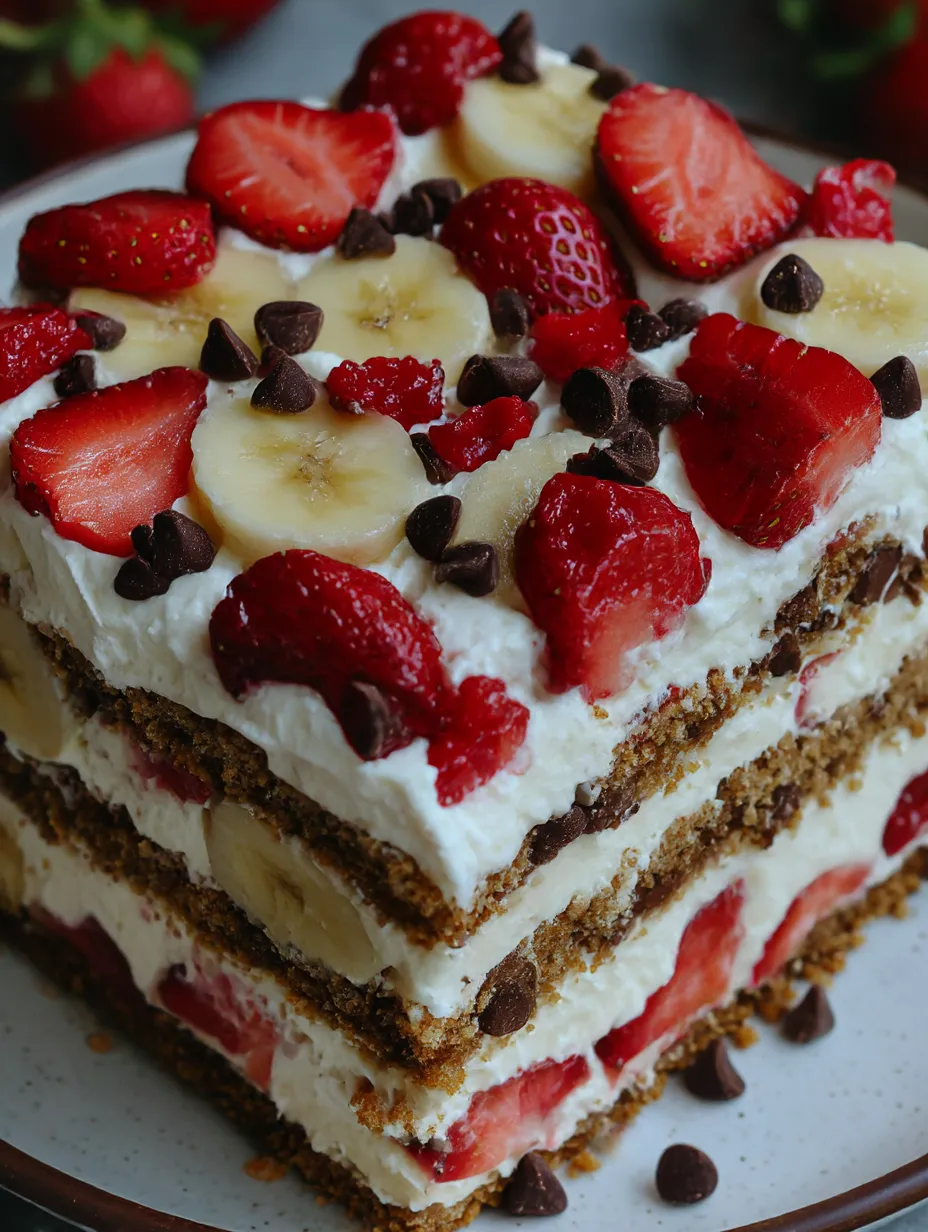
- Slice it into bars using a sharp knife and wipe between each for neat edges Best served cold for that creamy bite
- Garnish And Chill:
- After topping with nuts if you want and zigzagging lots of chocolate syrup go ahead and pop a cherry on each square Wrap it up and let it chill for at least four hours, better overnight so the flavors mesh
- Top With Whipped Cream:
- Smooth whipped topping all across the fruit, making sure to reach the sides and lock everything in place underneath
- Build the Fruit Layers:
- Begin with banana slices in neat lines, then spoon well-drained pineapple on top Go ahead and scatter berries all over to brighten things up
- Spread the Cream:
- Drop the creamy filling onto your chilled crust and spread with a spatula until it's all even That way, every piece tastes just right
- Make the Creamy Layer:
- Whip softened cream cheese with butter until nice and smooth, no lumps anywhere Add in powdered sugar and vanilla then whip till it's fluffy and thick which gives you a cheesecake-like middle
- Press Into Pan:
- Press that mixture tightly in a 9x13 pan Use your hands or measuring cup base to get an even layer Slide it in the fridge to set for a bit
- Prepare the Crust:
- Mix graham cracker crumbs, melted butter, and sugar together with a fork You want every crumb coated so it holds together
 Pin
Pin
I can't wait for strawberry season every year so I can toss them in this dessert They add a burst of color and flavor that brightens every bite My grandma used to let us sprinkle berries on top when we were kids it made the whole thing feel special
Storage Tips
Tuck any leftovers in the fridge with a good cover, and they'll keep for up to three days The bottom layer might get softer after the second day — so enjoy sooner if you can For parties, I haul it in a cooler and add the cherries when serving so it looks just right
Ingredient Swaps
Try chocolate sandwich cookies instead of graham crackers for a richer crunch trade cream cheese for mascarpone for a silkier texture Any pineapple works as long as it’s drained really well Just skip the nuts if you want a nut-free pan
Serving Ideas
Serve it chilled straight out of the fridge Cut it up into squares or bars then add a scoop of whipped topping if you like Sprinkle mini chocolate chips or more berries for extra fun Kids can pile on more cherries and make it their own
A Sweet Slice of History
Banana splits have been an American treat for over a hundred years The first one had ice cream loaded with fruit, chocolate, strawberries, and pineapple Turning it into an easy, no-bake dish means you get those classic flavors in a slice My family requests it for summer birthdays every single year
Recipe Questions & Answers
- → Can I prepare the dessert ahead of time?
Yep, make it the night before. It gets even better after chilling because the flavors really come together. The layers set up just right.
- → What kind of crust can I use?
Try the classic graham cracker crust, or swap in an Oreo crust if you love chocolatey vibes. Either way adds a tasty base.
- → Can I use fresh pineapple instead of canned?
Totally! Fresh pineapple is awesome. Just make sure it's drained well so things don't get soggy.
- → How should I store leftovers?
Pop any extras in the fridge with a cover. They'll keep for three days, and you'll want to serve it cold anyway!
- → Are nuts required for the topping?
Nope, you don't have to add nuts if you don't want. Some folks like a bit of crunch from pecans or walnuts, but they're totally optional.
- → Can other fruits be added?
For sure! Raspberries, blueberries, or even more strawberries are all great add-ons for a fresh twist.