
 Pin
Pin
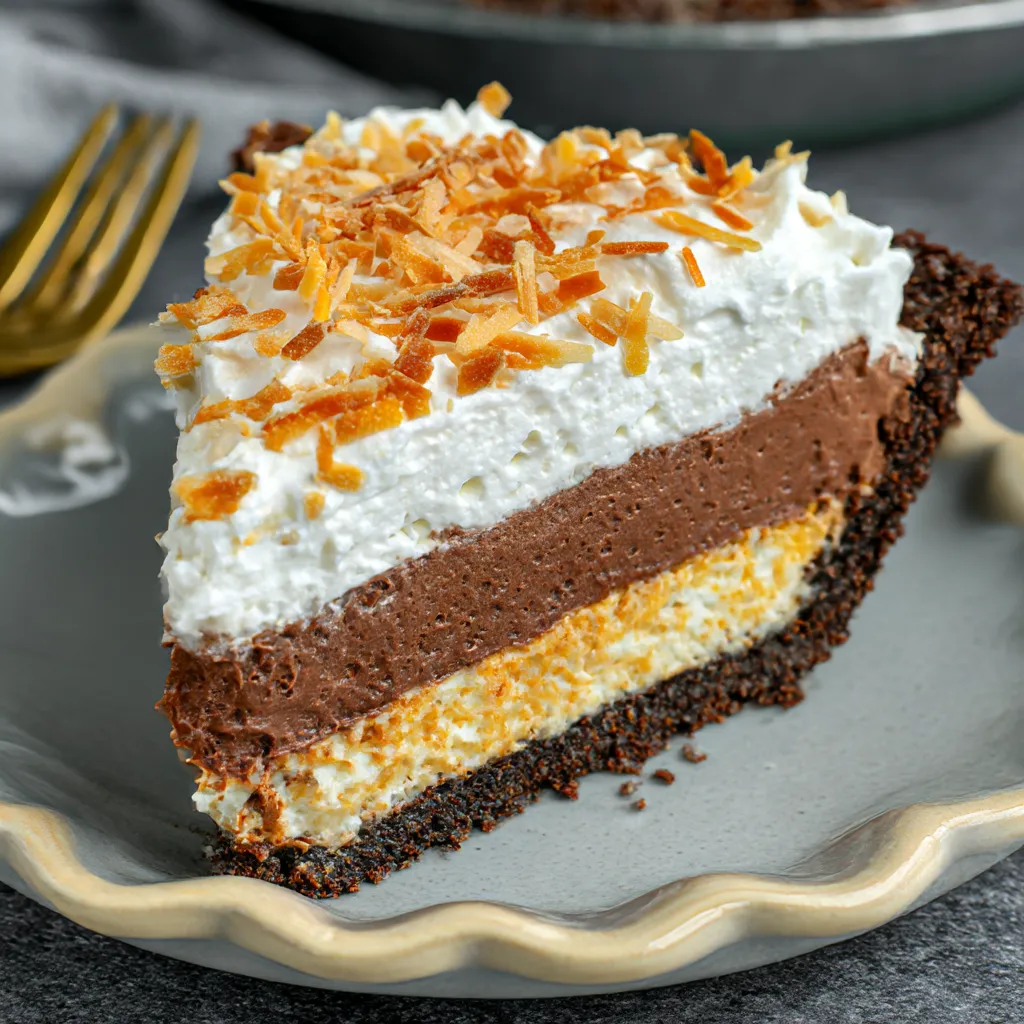
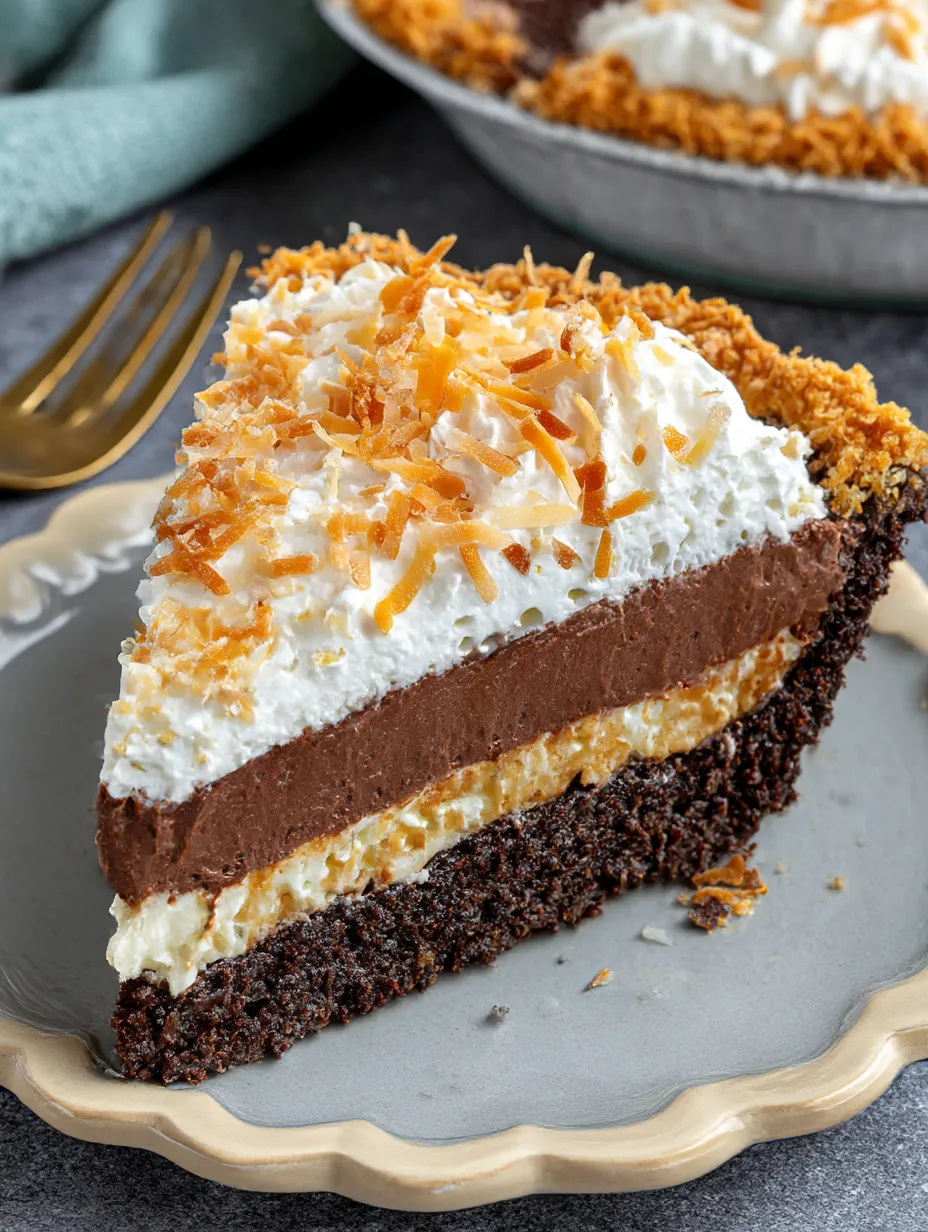
This dreamy coconut chocolate pudding pie is a hit for anyone crazy about chocolate and coconut together. Picture thick, silky coconut and chocolate pudding stacked up on a crunchy almond chocolate cookie base. Every slice gives you all the vibes of an Almond Joy. At our parties it always vanishes first. It’s a breeze to make ahead, too, so whenever you want a dessert that looks impressive with zero fuss, this one saves the day.
The first time I served this at a neighbor’s potluck, it was gone before I even grabbed a slice. Friends couldn’t stop asking how to make it. Now my family begs for it at every big dinner.
Dreamy Ingredients
- Oreo cookies: I toss these in as-is, cream and all, because it makes the crust extra fudgy. Any chocolate sandwich cookie will do if you want to try something else.
- Sliced almonds: Grab fat, sturdy slices—these add that crunchy, nutty snap. Check the bulk bins for freshest sticks.
- Shredded sweetened coconut: Stick to the sweetened kind for the best taste. Look for coconut that’s pretty white to make sure it’s fresh.
- Unsalted butter: Melt it all the way so it stirs in smooth and keeps the crust tasting awesome.
- Whole milk: Go with good milk here—a full-fat one keeps things luxurious and thick.
- Egg yolks: You want the big, yellow yolks here because they give that pudding richness.
- Granulated sugar: Plain white sugar is what you want. Make sure it’s not clumpy for a clean sweetness.
- Cornstarch: This has one job—getting the pudding thick so your pie slices nicely. Sift it so you don’t get lumps.
- Vanilla extract: Real vanilla does all the heavy lifting for flavor. Seriously, skip the fake stuff.
- Salt: Just a tiny bit brings out that bold chocolate taste and tones down the sweetness.
- Unsweetened baking chocolate: Good, dark chocolate takes the pudding up a notch. Chop it from the bar so it melts smooth.
- Whipped cream: Pile it high and fluffy. Whipping your own is way better than from the can.
- Toasted sliced almonds and toasted coconut: Sprinkle these on at the end for a golden, crunchy finish. You’ll know they’re perfect when they look lightly browned and smell nutty.
Stepwise Directions
- Bake the Crust:
- Blend up cookies, coconut, and almonds until the mix looks like sawdust but smells real good. Pour into a bowl, add all the melted butter, and mix so every crumb’s glossy and damp. Press this firmly into your pie pan—up the sides, too. Bake in the oven at three fifty degrees Fahrenheit for about twenty minutes until it feels set and darkens. Let it cool off before filling.
- Make Custard Base:
- Dump milk, sugar, yolks, salt, vanilla, and cornstarch into a medium pot. Whisk all the time on medium heat. This stops lumpy bits. In about five minutes, it’ll start to thicken up. You want it thick enough that drawing a line on a spoon stays put. As soon as that happens, pull it from the heat right away.
- Split for Two Layers:
- Pour half the still-hot custard into a bowl. Add the melted chocolate to that and stir it into a shiny, smooth chocolate pudding. In the pot, take what's left and mix in shredded coconut — it’ll make it thick and chewy. They should both be just warm enough to spread.
- Put It All Together:
- First, get the coconut custard down onto your cooled crust and spread it right to the edges. Next, gently layer the chocolate pudding on top. Spread so both colors stand out—looks super cool when you cut it.
- Chill in the Fridge:
- Lay plastic wrap right on the surface so you don’t get that weird skin. Pop the whole thing in the fridge until it’s cold and set—at least two hours, but it’s best if you leave it overnight.
- Add Toppings and Enjoy:
- Right before you’re eating, pile up loads of freshly whipped cream. Toss on toasted coconut and nuts for a crunchy top. Don’t be shy with the extras; it makes the pie look and taste extra special.
 Pin
Pin
My ultimate favorite part is the coconut pudding—used to sneak some straight from the bowl as a kid whenever my mom whipped up coconut cream. Now I share that habit with my little ones. The fight’s on for the biggest piece stacked with whipped cream and toasted coconut on top.
How to Store
When you’ve got leftovers, snug plastic wrap right over the pie and keep it in your fridge, up to three days. I like to stash toppings and whipped cream off to the side until you’re ready to serve, so things stay fresh and pretty. But honestly, it’s best eaten within twenty-four hours if you want those picture-perfect slices.
Ingredient Swaps
No Oreos? Any choco sandwich cookie or even chocolate graham crackers will do for the crust. Ditch the almonds or use pecans instead if you like. Want dairy-free? Swap in vegan milk and butter, just stay close so it thickens right. Out of cornstarch? Arrowroot thickens almost the same way.
Ways to Serve
This dessert barely needs dressing up, but tossing fresh berries alongside makes it look fancy for guests. Or go mini—bake the crust in muffin trays for hand-held pudding pies. Cut the bake time and chill little cups for a picnic-perfect treat.
Story and Origins
This treat totally leans into America’s adoration for sweets like candy bars and easy desserts. Pudding pies got big when mid-century cooks wanted speed and shortcuts. Swapping in a cookie base instead of fussy pastry is a straight-up American way to keep dessert simple—and still totally delicious.
Recipe Questions & Answers
- → Could I swap in another cookie for the base?
Totally! Try chocolate wafers or graham crackers. The taste will be a bit different, but it'll work fine.
- → How do I get my pudding to be nice and set?
Keep whisking while you bring the custard up to a soft boil. Let it get super cold—overnight in the fridge is perfect.
- → Is there a way to make this without dairy?
You can swap in non-dairy milk and vegan butter. Texture might change just a bit, but it'll still be tasty.
- → What's the easiest method for toasting coconut and almonds?
Spread both on a pan, toss into a 350°F oven, and bake for a handful of minutes. Keep a close eye—they brown in a flash.
- → Can I prep it ahead of time?
For sure! Put together the crust and pudding early, chill them, and top it off just before you’re ready to eat.